
Repair of Concrete Honeycombs
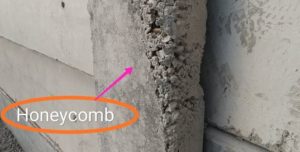 Honeycombs are basically voids on the concrete surface that look like honeybee nests. It might appear nasty or a cause for worry but it’s commonly regarded as just an eyesore problem, which just basically needs patching up. The repair of concrete honeycombs is sometimes essential where there instances when it can affect the structural integrity of the structure — especially when voids are deep and rebars exposed. Now, it requires delicate repair procedures.
Basically, a myriad of improper construction methodologies underlies every honeycombing problems. These includes improper vibration of concrete, high free-fall height of concrete during pouring, and not fully-sealed formworks during concrete pours, among others.
But whichever is the case, the governing repair principle is to achieve water-tightness within the voids as to prevent rebar corrosion. At Affordable Structural Builders, we execute proven and tested repair methodologies that goes further than just being effective, but also cost-efficient.
Honeycombing might seem like a simple problem to solve, but our years of experience from the industry dictates otherwise. We have seen many groups just patch up the voids like it’s some sort of a normal plastering session — and guess what, they failed miserably. Because frankly, it goes much deeper than that.
Repair Procedures for Concrete of Honeycombs
Firstly, prior to repair execution, the repair thickness must be determined because the type of patching material depends on it.
Though there are some groups that use cement grouts and mortars while others use epoxy as bonding agents, a good repair methodology builds its foundation on ensuring that any loose and foreign material within the voids are non-existent.
In the next section, we’ll outline our steps on how to repair honeycombs and explain the significance of prep works.
Step 1: Clean the substrate thoroughly (free from debris and loose materials).
Step 2: Dampen the substrate.
Step 3: Prepare patching material (follow manufacturer’s recommendation).
- If repair thickness exceeds 50 mm, use non-shrink grout.
- If repair thickness is less than 50 mm, use non-shrink mortar.
The difference between the two is that grouts are thinner than mortar allowing it to flow better into voids and other tight areas. Furthermore, if the area is inaccessible, you can use non-shrink grouts at your discretion. Although quite costly.
Step 4: Apply patching material to the substrate.
- If thickness exceeds 25 mm, apply patching materials in layer in 30-minute intervals.
Step 5: Finish the applied area using stainless steel trowels.
Step 6: Cure and inspect.
Prep Works for Concrete Honeycombs Repair
Prep works are oftentimes the neglected part of any repair procedures but in actuality, they hold the same value as excellent workmanship. Without prep works, however good your workmanship are, the repair procedure will surely fail.
-
Choose “non-shrink” patching material.
Non-shrink is specified to ensure water-tightness. It basically means that a cement-based material will not undergo shrinkage during curing which otherwise would’ve produced shrinkage cracks — a means of water seepage.
-
Choose a patching material with the same or stronger concrete strength.
A patching material weaker than the original concrete element will simply crumble in time because it can’t handle the stresses it’s subjected into.
-
Clean the voids thoroughly.
Having a clean substrate will prevent the patching material to adhere to foreign materials instead of the substrate, allowing strong bond adhesion.
-
Make sure that the substrate is damp prior to patching.
Because having a dry substrate will absorb the water on the patching material mixture, reducing the optimum amount of water-cement ratio. If the mixture becomes water-depreciated, it can cause problems with curing and strength attainability.
-
Follow the manufacturer’s recommendation on all the materials.
The manufacturer’s recommendation can be found on the packaging itself or the brochures included in the package. Follow it to the letter. If it says mix 8 litres of water for every 25 kg packaging, do so.
-
When to use epoxy as binder?
Use epoxy as binder to enhance adhesion strength between two separate materials, so that they act monolithically. Use epoxy as binder when concrete strength of patching material is weaker than the original concrete.
Our Advice
Take no chances and opt for the best and cost-efficient structural repair service. You can do so by letting us inspect your property and in turn, will patch up the honeycombs without so much of an issue. We, at Affordable Structural Builders have been repairing honeycomb problems for many years now and our clients couldn’t be any happier!